Greek Key Bulletin Board

Greetings!

I have an exciting new project to share with you! Some of you may remember that we are in a rental house so I am a bit limited on the changes we can make. A particularly hard room for me to inhabit is my kitchen… dated butterfly wallpaper, dark and dated wood cabinets and laminate counter tops. Bleh! I often fantasize about ripping out the wallpaper, painting the cabinets, tearing out the furdown and making some long-overdue changes… but that is work best saved for a home of our own down the road. Since I do 99.9% of the cooking in our family, so I am in this part of the house more than anyone. During said hours, I have come up with a few ideas on how to make the space more liveable and I will be sharing a few of my other renter improvements in this room later this year.


First, I had to do something about the large wall next to our fridge.


It could be worse, I think, but I get so, so tired of staring at all of those butterflies! Another small issue is all of the paper on our fridge and high counter in that room. We try to keep them to a minimum, but some items like schedules and school related papers need to stay accessible.

Solution: Bulletin Board

I knew that I wanted an upholstered bulletin board and for the result to have a bit of detail, but not add to the busy wallpaper. We have done tons of greek key motifs on headboards so I went with it and decided to make a plan!

I had a few yards of a seaglass linen on hand as well as some batting. The only supplies I had to purchase were the silver Dritz Nailheads and bulletin board.


I used a 24″ x 36″ bulletin board from Hobby Lobby.

I drew out the design beforehand to plan out exactly how many nailheads were needed to make the greek key at the corners of my bulletin board.


We laid everything out and used an air staple gun to upholster the board.


Of course, a regular staple gun will work too, but the air stapler is more fun!


Now, it was time to get the nailheads ready. With this design, the nailheads would have to overlap on the corners. I cut the nailhead tape to the lengths I needed, while trying to use as many of the pre-positioned holes as possible. Then I tapped holes into the ends that lacked a hole. This made it easier to nail down the corners.


After all of that prep work, I got to hammer away! I did the greek keys in the corners first, then filled in the straight areas in between.


Et, Voila!


This was a simple way to add a bit of sophistication to the space. I am very happy with the results!


The eye is drawn to the bulletin board and gets a bit of a break from all of our fluttering friends!


I’ve added a printable calendar from Clean and Scentsible, my yearly goals and a few of our other paper necessities. Though it may get a bit more disorderly throughout the year, it is a welcomed change!


Do you have a family “command center” in your home?
Have you done a project like this in your home?



Finished Tarva Nightstand

How is it the middle of September already? Time seems to be flying by lately!

We had the most incredibly wonderful, fantastic cool front last weekend! (I may have enjoyed it a little bit) In Houston, when the high temps don’t make you sweat like crazy the minute you walk out the door… Autumn is approaching. I welcomed these mild days with open arms, but they also reminded me that Fall is almost here and the end of the year is nearing the horizon. There was a twinge of sadness, but also excitement because it is almost my favorite time of the year… the Holidays!

Ever since Christopher made his transition into a big boy bed this past January, we have been using the small table from my nesting tables as his nightstand. I have been searching for a simple nightstand that I could refinish to match his dresser to no avail. I had contemplated using the IKEA TARVA nightstand and after little to no luck on my thrifting expeditions, I swung by IKEA for the TARVA.

I started this project with the simple unfinished TARVA nightstand from IKEA. In a stroke of pure genius, IKEA produced a completely “hackable” side table with drawer. There are infinite variations of this piece since it is literally a blank canvas.

A few ideas swirled around in my head, but in the end I stuck to the original plan and stained the TARVA to match Christopher’s existing dresser. I used the same Minwax Gel Stain in Chestnut.

I stained the piece before assembly to avoid any inadvertent gaps in stain. Also, it is much easier to manipulate individual pieces rather than the entire table.

A few weeks ago, I mentioned that I had finished staining Christopher’s nightstand and I finally got around to assembling it and putting the protective coat on it last week.

My favorite top coat is by far Polycrylic in Clear Satin. It provides fantastic protection without a heavy sheen. I applied three coats to the top, sides and drawer front/handle.

My best advice with any stain or sealer is to follow the directions to the letter. I ended up putting the Polycrylic on in our entryway due to the abhorrent amounts of humidity we’ve had in recent weeks. At long last, the finished product made its debut in Christopher’s room last Thursday.

I am completely pleased with the end result!

Have you “hacked” an IKEA piece in your home?


~ Corinne


Desk Reveal

At long last I am able to show you my lovely new desk. I finally managed to get the photos on my computer and carve out some time to write this post. It has taken a while to get everything just so. They say good design evolves over time… So I’ll just use that as my rationalization!


I started thinking seriously about creating a space for a writing desk late last year and shared some inspiration photos here. Initially, I was intending to use a much smaller desk. We are limited on space here in our townhome, but after seeing it in Ikea I knew it was just too small. I did another inspiration post earlier this year as I was mulling over new ideas. Finally, I decided on purchasing the Linnmon/Lerberg combo.


Of course, I was not going to leave the desk as-is. I may have a slight tendency to always want to change my surroundings for the better… At this very moment our built-in bookcases are being rearranged for at least the 4th time… Back to the desk.

I had decided at the beginning of this venture that I wanted the final product to be either in part of completely gold leaved. In the case of this desk I decided on the white lacquer top and gold leaving the legs. Although applying gold leaf is relatively simple it can be a tedious endevour. I initially intended to get Martha’s Transfer Adhesive and Foil Transfer Sheets. However, both times I went to Michaels they were out of both items. I ended up using another brand from Hobby Lobby, but was left a bit wanting; more on that later.


The first step was to apply the adhesive or sizing. The sizing sets in a matter of minutes, and then the gold leaf application can begin. I made the mistake of applying adhesive to about half of one of the trestles the first time. After having my arms, hands, and fingers stick to everything, I decided to go one leg at a time.

Next, carefully brush the leaves down with a soft paint brush.

Once I got my method down, I finished both trestles in about 2 hours.

Next, I used the same soft brush to sweep off any extra gold flakes. I did have to do a few touch ups in some areas where there was not adequate sizing.

Last, I applied 3 coats of Minwax Polycrylic. This is my favorite protective coating because it will not yellow over time like polyurethanes.

And here it is all finished. I apologize for the cell phone photo, but this is the only picture I have before I brought in the computer and accessories.

I am especially pleased with the result now that I have all of my “creative clutter” though.

Finally hanging my drapery panels didn’t hurt either… Most of the time they hide my mass of cords.

This has already become my new hub. I just love sitting down to browse for inspiration or check email. Another great perk is that I am right in front of our huge bedroom window. Trees, sky, and nature’s beauty are just a glance away.

My $6.00 Goodwill brass lamp provides wonderful task lighting.

A scrap of Edelman’s Croco Loco serves as my mouse pad while a Japanese display dish contains my fun gold paper and binder clips. The dish was given to me as a Chritsmas gift from my Gramma, along with 5 others. I plan on using the rest throughout my home, but this elegant little touch reminds me of her daily.

And this cute little face always brightens my mood.

Overall, I could not be more content with my little niche.

In retrospect, I would have probably waited for or purchased Martha’s adhesive and foil sheets online. The ones I used were extremely hard to handle because they constantly slid off of the paper backing. I watched a few videos on gold leafing with Martha’s products and it did not seem to be a problem.


So, what do you think of the new “me” space?


Chevron Burlap Wreath Tutorial

Today is the first day of Fall!

And I got my wish, cooler temps here in Houston. It has truly been blazingly hot and uncomfortable as of late. So much so that it was beginning to feel as though we would never hear that glorious phrase, “Cold Front.” But alas, after heavy rain here and there for the past two days, we finally have high temps below 90! … It’s the little things in life sometimes.

The cooler weather has me in a fall decorating spirit! I got out some of our fall décor, but have not really committed to it until this weekend! On that note, I want to share this fun project I worked on last week to get in the autumnal spirit.

I am still enraptured with chevron styling and when I saw this ribbon at Hobby Lobby a few weeks ago, I was sold! With my inspiration in hand I perused the aisles of the crafting Mecca until I came up with this collection of supplies.

My Supplies: 1 Sprig of berry branches, 1 small white pumpkin, 1 sprig of fall leaves, 1 stalk of wheat, 15 yds of 4″ wide plain burlap ribbon, 7 yds of orange Chevron ribbon, straw wreath, Scissors and a handy-dandy hot glue gun.

Here is a close up of the b-e-a-utiful chevron burlap… I am Loving this stuff!

Now for the how-to… I started out wrapping the 4″W regular burlap around the wreath as it came off the roll. However, I didn’t really like seeing all of the straw underneath. So I decided to fold it in half.

I was pleased with this result because I felt it enhanced the texture of the otherwise plain wreath.

Now for the fun part, Embellishment! I separated a few of the leaves and berry sprigs from the rest and bunched them together, forming this small bunch.

Next, I made a larger grouping with the wheat stalk, remaining berries and leaves.

Here is a photo showing both clusters. This should show you their proportions to each other.

I decided to group the two bundles together facing opposite directions. The larger bundle was placed vertically and the smaller bundle was beneath it following the curve of the wreath to form this grouping.

And now for the Chevron Ribbon! I used this video tutorial last year when making my Poinsettia Christmas Wreath and it came in handy again as a refresher. Then, using some straight pins, I spaced out the “tails” of my bow and glued them down.

Last, I glued down my bow and added the finishing touch, a small white pumpkin, to the center.

I am beyond happy with the result!

What do you think of the wreath? Are you doing any fall crafts?

Reupholstery: Dining Chair Seats

Last weekend I was finally able to complete a project that has been on my list for several months! (sigh of relief)

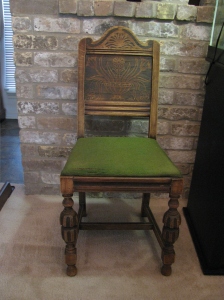
Last year, when we moved into our new place, we got a dining room set from my parents. It is a small set, but it was free and well made. My mother inherited the set from my great grandmother about 15 years ago (I think). It was the breakfast room table in my parents house until my mom got another table from my grandmother. And it was my great-grandmothers breakfast room table for about 30 or more years before that. (There is a furniture-collecting-addiction problem in my family ;-)… wonder where I got it from?!)

Ever since these chairs came to me, I have been needing to recover them. The fabric on them was basically in a thread-bare state.

IMG_8691 IMG_8693

I got some remnant Donghia fabric from work in December.

Donghia Wishbone in Celery/Aluminum

Then Geoff got an air stapler for Christmas and at that point I really had no excuse. And yet, its May and I am just now getting to it! 🙂 C’est la vie!

When I took the seats off of the chair frames, I noticed they were very dusty. Initially, I had  planned on just covering the seats with another layer of fabric and leaving the old fabric in place. After seeing so much dust, I decided it might be best to take off the old fabric and replace the padding.

And look what goodies I found underneath…

IMG_8873

Yep… that is the original straw padding!

IMG_8872

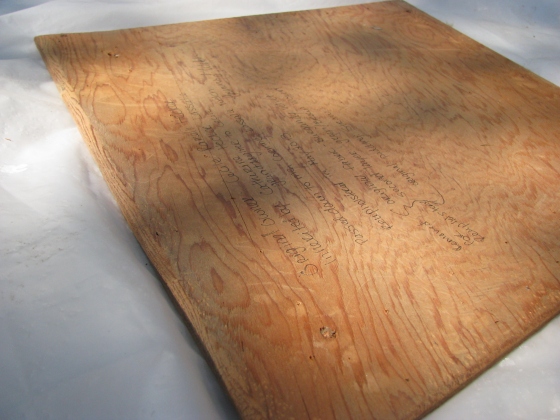
I kept the wood seats, but I couldn’t help being a little sad at the history that I was losing by throwing out the old fabric, etc. Dusty as it may be. So I decided to leave cuttings of each fabric and a little note to whoever might recover them next time! I put down the names of the previous owners and the date.

IMG_8875 IMG_8876

Then it was time for the new padding. I used this foam, picked up from a local craft store, and some left over batting.

IMG_8877

I cut the fabric with a 2″ selvage to be used for pulling while I stapled.

Now, when it comes to stapling… an air stapler is by far the way to go. Geoff and I made our headboard with a hand stapler. Suffice it to say I don’t want to do that again. We reupholstered another chair earlier this year with the new air stapler, but this was my first time using it solo. It did not disappoint.

Geoff was doing some maintenance on our cars, but with the ultra-spiffy air compressor we were able to run two hoses and work at the same time. As the hubs would say, “We couldn’t have done all that without an air compressor!” He is right ladies, and as a bonus, air powered tools are a complete blast to use. Just YouTube it… you will want one too 😉

Here is the finished product:

IMG_8921

Now, the chairs are much more comfortable to sit in. And I love the new fabric!

Did you get around to any long overdue projects over the weekend?